
USER’S MANUAL – How to use eConstela
Below you will learn about all the features included in eConstela so that you can get the most out of it.
Keyboard shortcuts and tricks will help you to speed up your handling of the tool and improve the quality of your client sessions.
1. What each icon does
 |
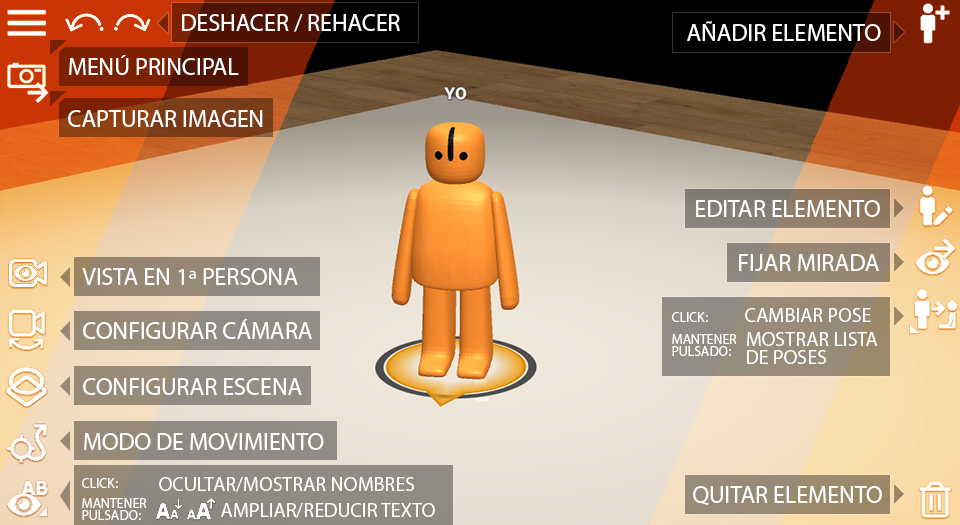
MAIN MENUAccess various options such as Create New Scene, Save or Load Scene. |
 |
UNDOUndoes the last changes made to the scene. |
 |
REDORetrieves the last changes if “UNDO” was recently pressed. |
 |
CAPTURE IMAGECapture the image on the screen, so that it can be saved or shared with the customer. |
 |
HELP NewWhen activated, it displays the function of each icon when hovered over. Press again to deactivate.> |
 |
1st PERSON VIEWAppears when you select an element and allows you to see the scene from its point of view. |
 |
CAMERA SETUPActivate and deactivate camera movement by dragging with the mouse. |
 |
CONFIGURE DASHBOARDAllows you to change the shape of the work table (square and circular), the background and to load templates(More info). |
 |
MODES OF MOVEMENTToggles between the different modes (keyboard shortcuts can also be used): |
 |
HIDE/SHOW NAMESToggles between Hide and Show the names or labels that appear on items. |
 |
REDUCE TEXTReduces the size of the text that appears over the elements. |
 |
INCREASE TEXTEnlarges the size of the text that appears over the elements. |
 |
REDUCE EMOJI NewEnlarges the size of the emoji that appears over the elements. |
 |
INCREASE EMOJI NewEnlarges the size of the emoji that appears over the elements. |
|
Actions associated with the element:You can find more detailed information on the following icons in“What actions can the elements perform“. |
|
 |
ADD ITEMOpens the window that allows you to create a new element and add it to the scene. |
 |
EDIT ITEMOpens the window that allows you to edit the properties of the selected element. |
 |
FIXING LOOKAllows the selected element to fix its gaze on another element and follow it through the scene. 1. Select the element to gaze at. (Presses the button again to release the gaze) |
 |
CHANGE POSITIONToggles between the different postures available for the selected element. HOLD* to display: Panel with available poses |
 |
REMOVE ITEMRemoves the selected element from the scene. |
*  If an icon shows a small arrow in one of its corners, it means that it can be HOLD CLICKED to extend a menu with more related options. Click anywhere in the scene to hide the panel, if it does not have a “close” button (X).
2. How to move the elements
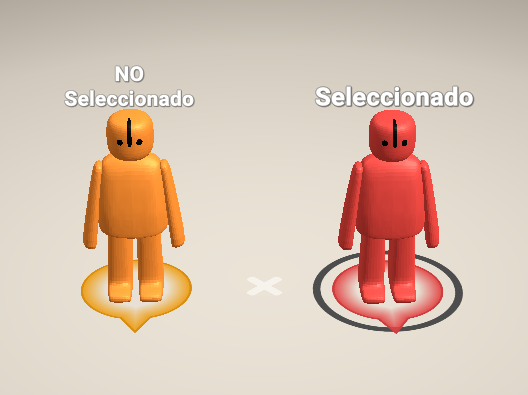
You can select any element by CLICKING on it.
Deselect by pressing anywhere without elements or by pressing the DELETE key..
The selected element shows a black indicator at its base.
When you select an item, icons will appear on the right side of the screen. These actions affect only the selected element:
|
|
|
|
| Edit | Look at… | Change pose | Delete |
More information on“What actions can the elements perform“.
Once selected, you can move the element in different ways:
2.1. Dragging with the mouse to the new position.
The element will move in different ways according to the selected “Motion Mondo”.
FREE MOVEMENT
When dragging, the element moves towards the cursor and rotates to face the direction of movement.
SHIFT: Hold down CTRL + SHIFT while in “Select” mode.
MOVE
 When dragging, the element moves to the cursor but does not rotate.
SHIFT: Hold SHIFT while in another mode.
ROTATE
 When dragging, the element faces the cursor but does not move.
SHORTCUT: Hold CTRL while in another mode.
SELECT
 To select an element without changing its position or rotation.
SHORTCUT: Hold down CTRL + SHIFT while in another mode.
NOTE: You can modify the dragging speed in the“SETUP” window.
2.2. With the keyboard:
– MOVE: press Arrows ←↑↓→ to move the element.
– Press CTRL +↑↓ to move forward and backward.
– ROTATE: press the N M* keys or hold down CTRL + Arrows ←→.
– If the element has a fixed gaze, the N and M* keys will rotate the element around its target.
– Press and hold SHIFT to move/rotate faster.
* You can modify the keyboard shortcut for rotation in the“SETUP” window.
3. How to move the camera/scene
There are several ways to move the camera to view the constellation from different perspectives:
3.1. With the mouse, select somewhere where there are no elements and drag to change the angle and elevation from where the scene is viewed.
Hold SHIFT + drag to move the center point of the camera (useful to focus on an element or set of elements away from the center of the board).
Roll the CENTER WHEEL of the mouse to zoom in and out.
NOTE: You can modify the dragging speed in the “SETUP” window.
3.2. With the keypad, if no element is selected:
Press Arrows ←↑↓→ to change the angle and elevation from which the scene is viewed.
Hold down CTRL + Arrows↑↓ or press the +- keys on the numeric keypad*, to change zoom.
Hold down SHIFT + Arrows ←↑↓→ to move the center point of the camera.
* You can modify the keyboard shortcut for +/- in the“SETUP” window.
3.3. Use the number keys on the keyboard (top: 1, 2, 3 … 9, 0) to switch to the default views:
1 Front
2 Right
3 Back
4 Left
5 – 8 Diagonals
0 Top view (from above).
3.4. Use the numeric keys on the ” side numeric keypad” to switch to the default views around the board:
| 7 | 8 | 9 |
| 4 | 5 | 6 |
| 1 | 2 | 3 |
| 7. Rear-Left Diag. | 8. Rear | 9. Diag Rear-Right |
| 4. Left | 5. Zenith (Upper) | 6. Right |
| 1. Front-Left Diag. | 2. Front | 3. Diag Front-Right |
4. What actions can the elements perform
4.1. Add/Edit element:
You can add an element in either of these two ways:
A. By DOUBLE CLICKING anywhere on the board.
B. Pclicking the icon . In this case, the added elements will be aligned on the side of the scene waiting to be placed one by one in the desired position when the time comes.
Once in the scene, with the element selected, you can edit its properties by clicking on the icon to reopen the configuration window.
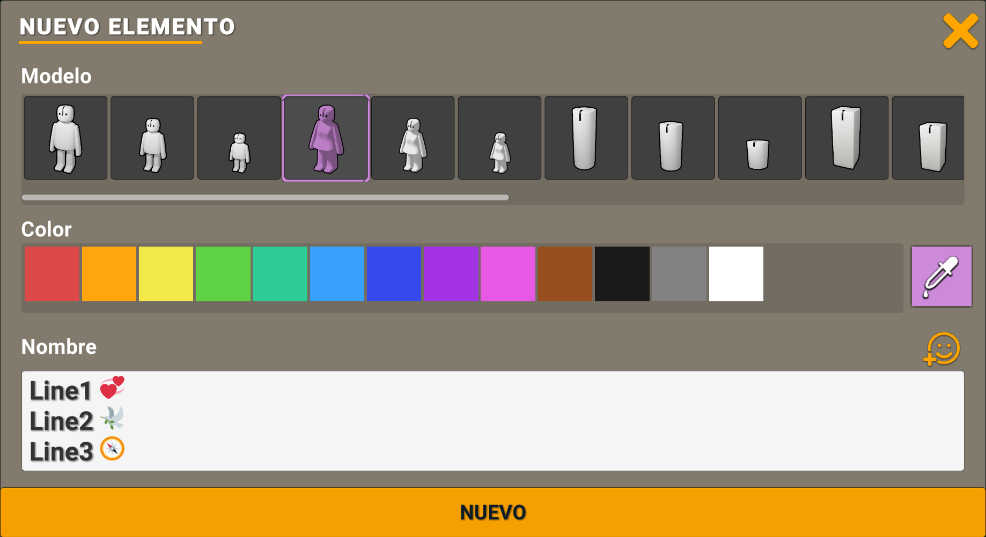
In any case, a configuration window will be displayed where you can choose:
– Model: basic characters, geometric shapes or text. Under “SETUP” you can define the visible collections.
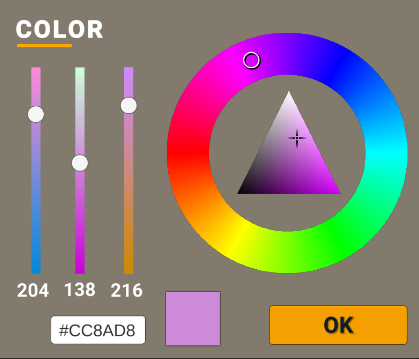
– Color: choose from the predefined colors or press  to choose a custom color.
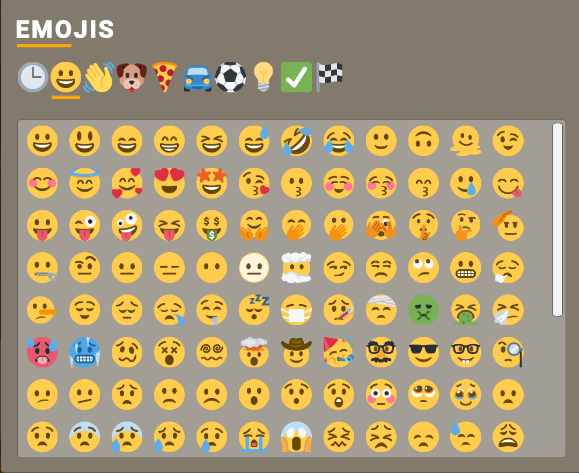
– Label: to name the element and distinguish it in the scene. Allows several lines of text and emojis (press  to open the emoji panel). Labels can be hidden later by clicking on the icon
4.2. “Look at…”:
Fix your gaze on an element by DOUBLE CLICKING on it or by clicking on the icon .
You can then CLICK on another element or on a point on the board, keeping your gaze fixed when the target or the element itself moves.
When you want to release the gaze, click again on the icon  or press the DELETE key.
4.3. Change pose:
Toggle between the different poses by clicking on the icon .
PRESS and HOLD to display “Pose List” and choose the desired pose without having to go through all of them.
Example: Standing, head down, sitting, lying down.
NOTE: Some elements only support basic poses.
4.4. Delete:
Remove an element from the scene by pressing the DELETE key or by pressing the icon .
4.5. Resize: New at
Increase or decrease the size of the element by pressing the +- keys (configurable keys).
5. How to set up the scene and the boards
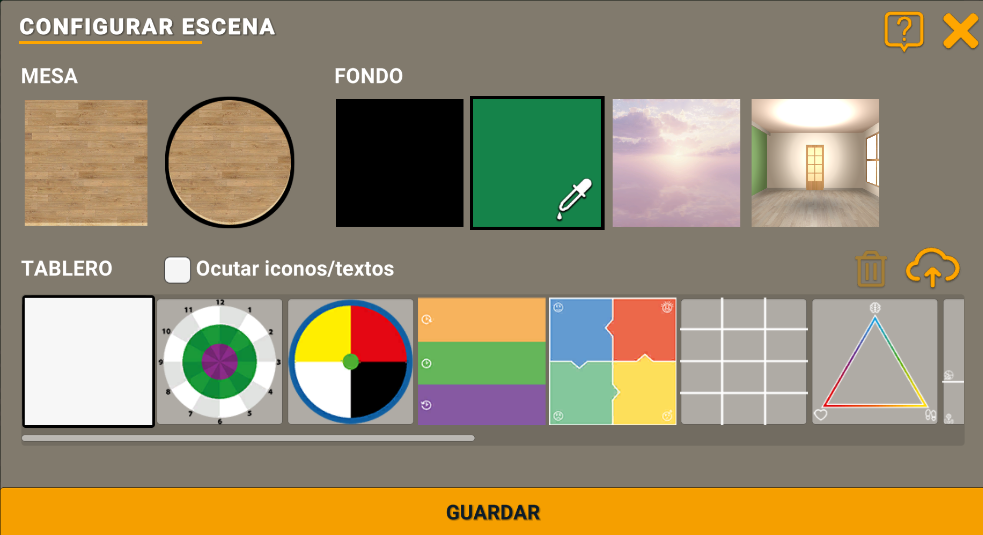
You can change the scene settings by clicking on the icon .
A window with the following options will appear:
5.1. Table shape:
You can alternate between square and circular.
5.2. Background:
Select between black background, color (press to choose custom color), sky or 3D room.
5.3. Work table:
You can choose from the different workboards available or upload your own customized one by clicking on the icon  .
.
To delete custom boards that you no longer use, select it and press .
You will also be able to“Hide icons/text” from the boards in order to work blindly and not condition the user.
NOTE: Some boards work better on a circular or square table depending on their shape.
6. How to manage my sessions
Manage your sessions by clicking on the icon .
A window with the following options will appear:
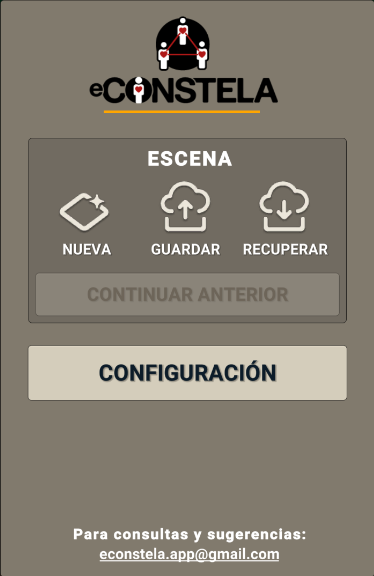
6.1. New scene:
Clears the scene to start a new session.
6.2. Save scene:
Save the scene by choosing a name to retrieve it later.
6.3. Recover scene:
Browse the saved scenes, load or delete the selected scene as needed.
6.4. Continue Previous:
It allows you to continue the previous session exactly where you left off. Even if it was not saved.
7. How to configure my preferences
Configure your user preferences by clicking on the icon ►“SETUP“.
A window with the following options will appear:
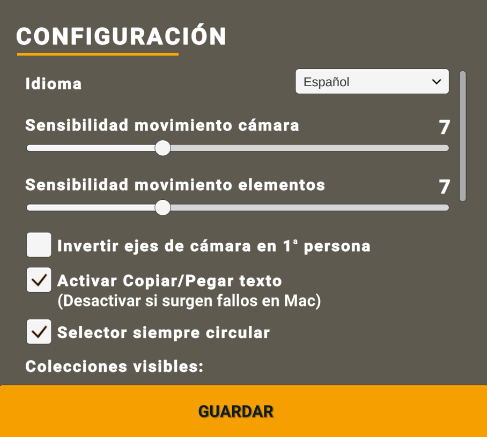
7.1. Language: Configure the application language: Spanish, English, French, German, Portuguese, Italian, Spanish.
7.2. Camera movement sensitivity: speed at which the camera moves when you change its angle by dragging with the mouse.
7.3. Sensitivity movement elements: speed at which the elements in the scene move and rotate when dragging them with the mouse.
7.4. Invert camera axes in 1st person: First-person camera behavior when clicking and dragging: Dragging sensation VS steering sensation.
7.5. Activate Copy/Paste text: The copy and paste function may cause problems in some browsers. Disable it to see if it fixes it.
7.6. Selector always circular: forces the element selectors to be circular, instead of circular/square according to the base shape of the element.
7.7. Visible collections: allows you to activate and deactivate the various collections of elements that are displayed when adding elements to the scene.

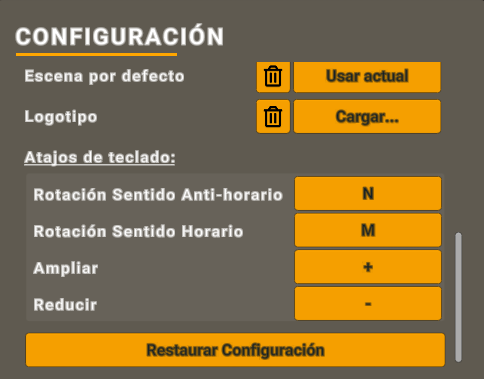
7.8. Default scene: uses the current scene as the default scene for when a new scene is created or started without retrieving a previous scene. Press the trash can button to use the default scene.
7.9. Logotype: Upload a custom logo to display as a watermark. Press the trash can button to delete the current logo.
7.10. Keyboard shortcuts: In case the keyboard shortcuts do not work on your computer, you can redefine them to the keys you prefer (not used in other platform functions: arrows, 1..0, etc.)
7.11. Restore Configuration: Restore default configuration values (changes are applied when the platform is restarted).
8. How to upload a custom logo
You can upload a custom logo by clicking on the icon ► “SETUP” ►“Logo: Upload...”.
A window will appear where you can select a file from the files on your computer.
It is recommended that the file meets the following characteristics:
– Approximate size/proportion: 300px wide x 150px high.
(If taller or wider, it will be reduced to fit those proportions).
– File size: <1Mb.
– PNG format with transparency.
(Accepts JPG, but background color will be visible)
– For better visibility, the logo should have an additional black (if the logo is light) or white (if the logo is dark) border.
Example:

If you want to stop using the custom logo, click the button .
9. How to log in with a client
Although eConstela Basic does not allow the client to interact directly with the scene, you can share the screen with any videoconferencing tool so that the client can follow the session live.
The steps to follow are similar for all common tools(Zoom, Google Meet, Microsoft Teams, Skype, etc).
- Visit econstela.com from your PC or Mac browser and click on“Login“.
(eConstela is not yet 100% compatible with mobile devices). - Enter your username and password and then access the tool by clicking on“Use eConstela“.
- It is recommended to practice the different options that eConstela allows in order to gain agility before starting the first session or in case there are changes in a new version.
- Set up the scene with the table shape and the table top to be used in the session(see point 5).
- Create a videoconference room with your usual tool (or make a video call).
- Share the session invitation link via email or your usual instant messaging application.
- Optionally access the session from another device to use your camera.
(In this case remember to mute 🔇 one of the two connected devices from the video conferencing tool). - Usually initiates the session with the client(Interview, identification of key elements, purpose…)
- When the time comes, share the browser window from the“Share screen” option and present the tool.
- The client will now be able to see the eConstela scene while you interact with it.
- Invite him/her to choose characters that will represent each of the key elements(see point 4.1).
- Place the elements in the position indicated by the client and ask about the direction of the gaze and the pose in which he/she wishes to place it (standing, bowing, sitting, lying down…).
- Move and modify the elements as the session evolves.
- Once the session is closed, you will be able to take a snapshot by pressing and share it with the user via email or instant messaging.
Do you have any doubts?
You can contact us at econstela.app@gmail.com and we will solve them for you.